Creating a Xero API public application with node.js
Xero public applications authenticate with the Xero’s API using three-legged oAuth 1.0A. This is an authentication process where the user explicitly logs into Xero to authorize access by the application (the consumer). This authorization lasts 30 minutes until the access token expires.
Creating an API client in node.js is straight-forward and only requires the standard oauth package. The diagram below summarizes the process:
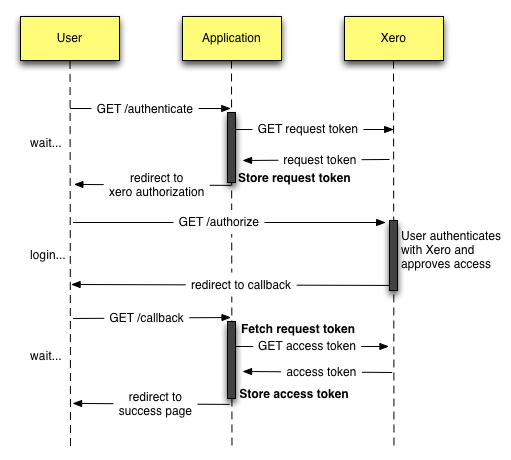
To start, register a public application with the Xero API to obtain a Xero consumer token and secret. These are the app’s credentials that are used to obtain a Request Token.
Then:
-
Create an endpoint in your application where the user initiates the authentication request.
eg. create a Connect to Xero button to GET’s this endpoint. It’s essential that the user initiates the request; the three-legged protocol depends on a web view and redirection of the user’s requests.
You set up oauth module to make a synchronous (blocking) request to Xero to get a Request Token for your app, then redirect to user to Xero’s authorize page with that token parameter.
-
Create an endpoint where Xero will callback to your application with the request token and a verifier.
When the user logs into Xero and authorizes your app Xero will redirect the user to this end-point with the request token and verifier as parameters.
You set up the oauth module to make a synchonous (blocking) request to Xero to exchange the Request Token for an Access Token. If successful, this endpoint will redirect the user to the next page in your app, while you can then initiate any asynchronous or other work with the API. All future requests to the API use the oauth module and the access token.
It’s essential to persist the tokens across multiple requests. A session object is the simplest place to store this data.
A detailed diagram of this whole process is in the oauth bible.
Example application
I’ve posted a example application on github that demonstrates the process and configuration of the oauth module.
The application uses hapi.js as a web framework, but the code should also be very familiar to anyone using express or koa. It uses the hapi.js yar plugin for session management.
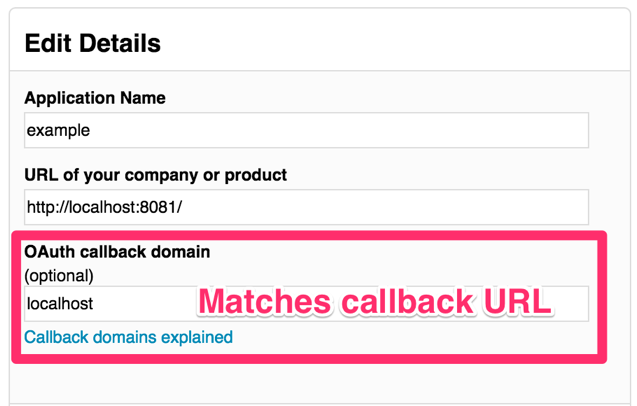
Configuration of the endpoints: The end-point URLs are arbitrary, but the callback URL here needs to match the one passed to Xero as one of the oAuth request parameters (see below). Also, the domain of the callback URL must match the callback domain specified in Xero’s app configuration. For testing a public application, you’ll have to set the callback domain in Xero so it matches your testing URL.
Setup oAuth module so it works with Xero’s API: The constants here are those provided by Xero to access the API. HMAC-SHA1 is used for signing the requests. In this gist we set ‘oauth._authorize_callback’ to the URL we need Xero to redirect to (and provide the request token parameter). This points to the application’s other endpoint. It also must match the callback domain specified above.
Finally, for the authentication operations: When the user accesses the authenticate endpoint, we use the oauth module to get a Request Token, then redirect the user to Xero’s authorize page. That’s where they’ll login to Xero and authorize the app.
Xero will redirect them to the callback: When the user is redirected to the callback, we use the oauth module to get the Access Token (exchange the request token for access), then direct the user to our success/next page.
Once we have and store the access token, we access the api using oauth.get() etc.
Download the full source on github.